Notifications are one of the most important features of any mobile app, as it helps to engage the users. There are various services available to send push notifications such as Google Cloud Messaging or Firebase Cloud Messaging. Here in this article, we will see how to send push notifications using the Azure Notification Hub.
What is Azure Notification Hub?
Azure Notification Hub is a push engine that allows us to send notifications from any platform to any platform. It's not a Platform Notification Service (PNS), like Firebase Cloud Messaging (FCM) or Apple Push Notification Service (APNS). Azure notification is a middleware between our backend systems and PNS.
Why Azure Notification Hub?
Azure Notification Hub has various advantages, such as:
- Supports cross platforms such as Android & iOS
- Supports multiple backend languages
- Easy to scale
- Highly secure
To know about the advantages in detail, you can have a look at the link provided in the references section below.
How does PNS work?
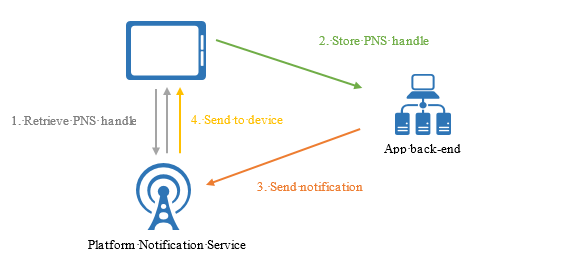
Every PNS has its own logic to send a notification to a device. As PNS's are not unified, it is mandatory for a backend developer to write PNS-specific code. The following diagram demonstrates the functionality of PNS:

How does Azure Notification Hub work?
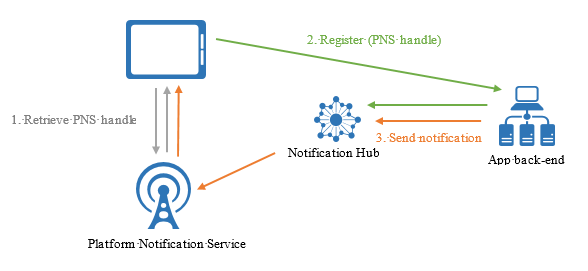
In the Azure Notification Hub, we don't need to write PNS-specific code in the backend. PNS-specific code is managed by the Azure Notification Hub. We need to send a notification to the Azure Notification Hub, and it will send a notification to a specific PNS. The following diagram demonstrates the functionality of the Azure Notification Hub:

Azure Notification Hub is not only beneficial for backend developers, but it also makes mobile developers' life easy. It reduces a lot of extra efforts required in FCM. In the Azure Notification Hub, a one-time configuration is required with FCM or any other PNS.
The device must be registered in the PNS before receiving any notification. Azure notification simplifies the device registration process. Unlike FCM, we don’t need to save registration tokens in our backend. Token registration is managed by the Azure Notification Hub itself. In FCM, we are storing registration tokens using API in the backend. Also, we need to manage the token registration process.
Azure Notification Hub's Tags
What is a Tag?
One thing, which I love about the Azure Notification Hub is its Tag. We do not have registration tokens, registration tokens have been replaced by Tags for developers. Notifications are sent with the help of Tags. Registration tokens are internally managed by the Azure Notification Hub. We don’t need to call an API to save registration tokens in the backend, we need to register Tags.
Tag format
A Tag can be any string of up to 120 characters. A Tag may contain alphanumeric and some non-alphanumeric characters like _, @, #, ., :, -.
Usage
As notifications are sent on the basis of Tags, we are using the user’s user id as a Tag. We do not need extra mapping with PNS registrations token and app users' user ids. All these are managed with the help of Tags.
Tag registration limit
We can register up to 60 Tags per application, we can send notifications based on various Tags combinations. As we can register up to 60 Tags per application. We can create combinations based on Tags.
Example
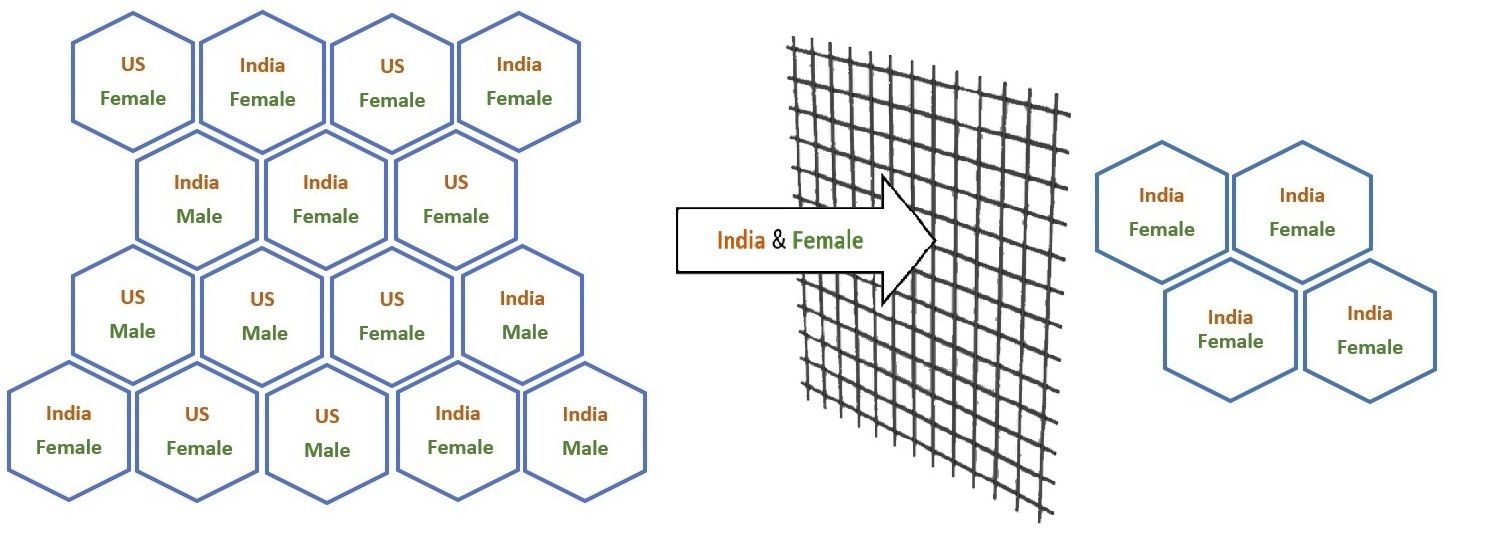
Here want to send notifications based on location and gender, and yes, it's possible with Tags. We need to register two Tags, the user's location, and the user's gender. In the backend, we need to mention two Tags then qualified users will get notifications. If we don't use the Azure Notification hub, we need to perform two steps. First, we need to extract registration tokens from the table based on criteria. Second, send notifications to those who have qualified.

Hope this article helped you to understand why we need to use Azure Notification Hub with Push Notification Service and how Azure Notification Tags can be used to filter and send notifications to groups of users.

