As we all know uploading the iOS App on the App Store is a very long procedure. Some developer gets stuck at the certain point and fails to upload the app. So let's make the procedure very short of uploading the app with Fastlane Tool.
Fastlane provides the easiest way to build and release the mobile apps. It handles the time-consuming task for you, so you don't have to waste your development time.
Through Fastlane you can automate the process of taking the screenshot of the mobile app screen, building the app for the different environment such as Adhoc, Development, and App-Store, matching the correct provisioning profile with the correct signing certificate to build the app.
This all steps can be easily handled by Fastlane, you just need to install and setup the Fastlane in your project directory and configure the lane to execute the steps and just one final command to run the lane for the final output.
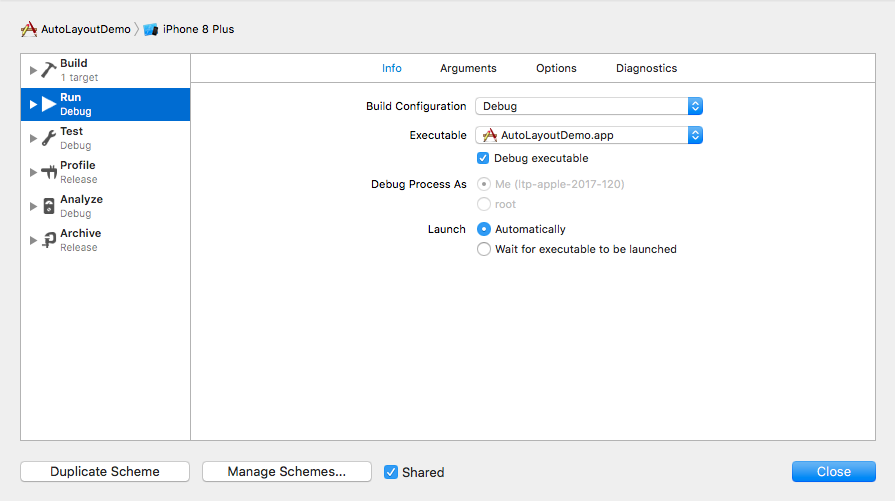
Before starting the setup make sure you have shared your project scheme so fastlane can use it. Make sure you have checkmark the shared option.

So, let first install the Fastlane through terminal:

Once it's installed on your system now navigate to the project folder on the terminal.
Now, initiate the fastlane setup for the project by running this command:

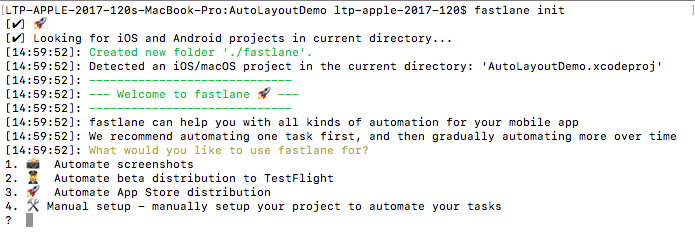
Fastlane will run and will show you some option for setting up the fastlane for the project see below:

As you can see it gives you 4 option:
- First for taking the screenshot of the app.
- Second for automating the process of beta distribution of the app to TestFlight.
- Third for distributing the app on App Store.
- Fourth for setting up the steps manually you want.
For example: Let's see the second option for beta distribution of the app to TestFlight. You have to enter the number from the options given above on the terminal and press enter.
Now Fastlane will execute some commands and will ask you few details which are necessary for beta distribution such as Apple User ID and Apple ID password.
Once the setup is done successfully you can see one folder name "fastlane" created in the project directory. Fastlane folder contains two files "Appfile" and "Fastfile".
Appfile contains the detail of the App Identifier, Apple ID, Team ID and ItunesConnect Team ID.
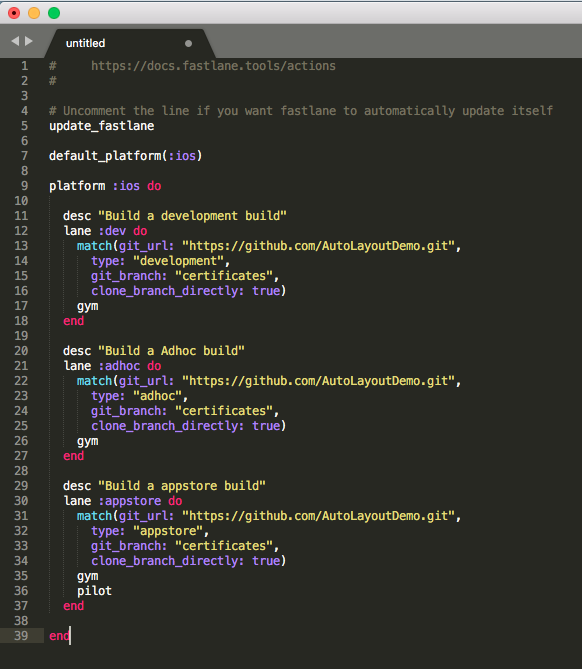
Fastfile contains the detail of the lane which includes the steps for build and uploading process. You can make the different lane for the different environment such as Adhoc, Development, and App-Store.
The basic setup is almost done, now the main part is setting up the provisioning profile automatically for that you have to use the "Match" tool provided by the fastlane. Make sure before using match tool delete all your previous provisioning profile created manually.
Match tool creates new provisioning profile automatically and the certificates need to be stored in the private git repo or store in different branch of the same project git repo because it will be shared with the all the developer which work on the same project for easy access of the certificate and provisioning profile and can be easily installed on the developer machine.
To make new provisioning profile and signing certificate through the match tool you need to run these command. Make sure you are in the project directory and run this command in the terminal.
fastlane match development
This will create the development certificate and provisioning profile.
fastlane match adhoc
This will create the adhoc certificate and provisioning profile.
fastlane match appstore
This will create the appstore certificate and provisioning profile.
Now we have done all the setup and ready to use the fastlane. After all the setup is done the fastfile should look like this :

Now you are all set to run the fastlane for build and release the app.
// fastlane platform lane     ----   Syntax
fastlane ios adhoc              // Build adhoc build
fastlane ios development        // Build development build
fastlane ios appstore           // Build appstore build
Just run this command save your time.

