
Nearly every project/app needs an alert popup. It is an essential UI element to:
- Provide information/warning to the user before performing any action
- Handle user interaction to perform any action
- Notify the user on completion of an action
The default alert popup is very simplistic. Nowadays, we see a unique style and attractive UI in popups rather than showing a classic native/default one.
What do you show in a popup?
Title, message, image, and action buttons. Isn't it? But if you want to make your custom alert popup, it requires a lot of effort as you need to manage
- UI design
- Constraints
- Action handler
- Device orientation
- Animation and many more
Due to these reasons, creating your popup is a very challenging task. A third-party library also has its limitations.
While I was investigating a better way to put in place a custom native alert. My goal was to customize the native alert view (UIAlertController). I found, by setting UIViewController as the content view of the UIAlertController, I can achieve it.
This would save a lot of time and effort.
Let's see how to integrate UIViewController as a custom view of UIAlertController.
I am going to add UIViewController inside the storyboard and configure it with the class. I will also add an image view and two labels inside UIViewController to show the title and message with the image in the popup as following image and code. messageLabel will be used to calculate the preferredContentSize of UIViewController. You can add details and modify UI.
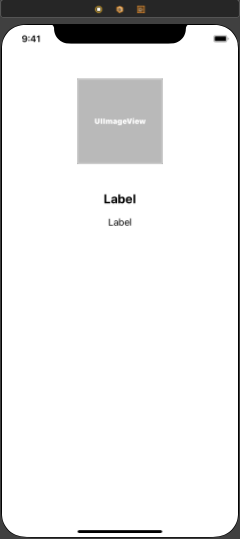
    @IBOutlet private weak var imageView: UIImageView!
    @IBOutlet private weak var titleLabel: UILabel!
    @IBOutlet private weak var messageLabel: UILabel!

    var alertImage = UIImage()
    var titleText = String()
    var messageText = String()

    override func viewDidLoad() {
        super.viewDidLoad()
        setValues()
        // Do any additional setup after loading the view.
    }

    private func setValues() {
        imageView.image = alertImage
        titleLabel.text = titleText
        messageLabel.text = messageText
    }

    override func viewDidLayoutSubviews() {
        super.viewDidLayoutSubviews()
        preferredContentSize.height = messageLabel.frame.size.height + messageLabel.frame.origin.y + 30
    }
Once the view controller's configuration completes, I will add a method to set the above view controller as a content view of a UIAlertController. I will also add the init method for initialization and addAlertAction method to handle actions as follows:
extension UIAlertController {

    convenience init(style: UIAlertController.Style, title: String? = nil, message: String? = nil) {
        self.init(title: title, message: message, preferredStyle: style)
    }

    func addAlertAction(title: String, style: UIAlertAction.Style = .default, handler: ((UIAlertAction) -> Void)? = nil) {
        let action = UIAlertAction(title: title, style: style, handler: handler)
        addAction(action)
    }

    func setViewController(image: UIImage, title: String, message: String) {
        let storyboard = UIStoryboard(name: "Main", bundle: nil)
        guard let viewController =
            storyboard.instantiateViewController(withIdentifier: "CustomViewController") as? CustomViewController else {
                return
        }
        viewController.alertImage = image
        viewController.titleText = title
        viewController.messageText = message
        setValue(viewController, forKey: "contentViewController")
    }

}
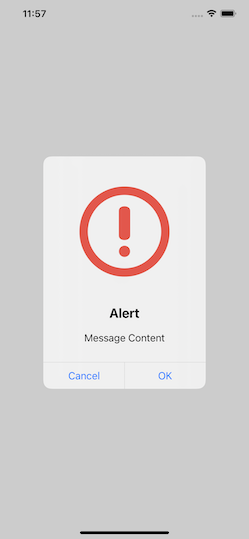
That's it. The alert popup is ready. Now you only need to call alert popup method.
private func showAlertController() {
        let alertView = UIAlertController(style: .alert)
        alertView.setViewController(image: #imageLiteral(resourceName: "alert"), title: "Alert", message: "Message Content")
        alertView.addAlertAction(title: "Cancel") { (_) in
        }
        alertView.addAlertAction(title: "OK") { (_) in
        }
        present(alertView, animated: true, completion: nil)
    }
You can also use custom view/XIB as the content view of UIAlertController and update constraints.
You can download sample code from here.
I hope this blog helped you. If you have used any other library or solution, we would like to hear back from you. Please share it with your peers.
Thank you!