
For the past few months at Kiprosh, we've done versions upgrade of multiple mid to large scale Ruby on Rails applications. One of them was running Rails version 3.2.22. That's where we found out that, we need to make a lot of changes in our codebase to run our application on version 4.0. Hence, we thought to write this blog post to share our insights and recommended strategies for upgrading such mid to large Rails applications.
Rails guides provide us a brief information on how to upgrade the Rails app, but we need to know more to smooth our development process.
Upgrading Rails can be a challenging task in Rails app development life-cycle, it just gets complex overtime depending on the Rails version gap (ex: 3.2.x to 5.2.x)
To make our workflow smoother and less painful, we will explore some insights in this article. I hope these insights will help in smoothening the upgrading experience.
Let's start with cleaning up Gemfile
During our upgrade process we will use bundle install and bundle update many times. When we run bundle install or bundle update we may get gems dependency error(s).
As per the dependency error(s), we will update our Gemfile by writing version number besides it and bundle it again. If that does not solve our problem then it is better to bundle gems again with empty Gemfile.lock rather than resolving those dependency errors(s). To empty Gemfile.lock, we need to maintain versions in Gemfile as below (see fig 1)
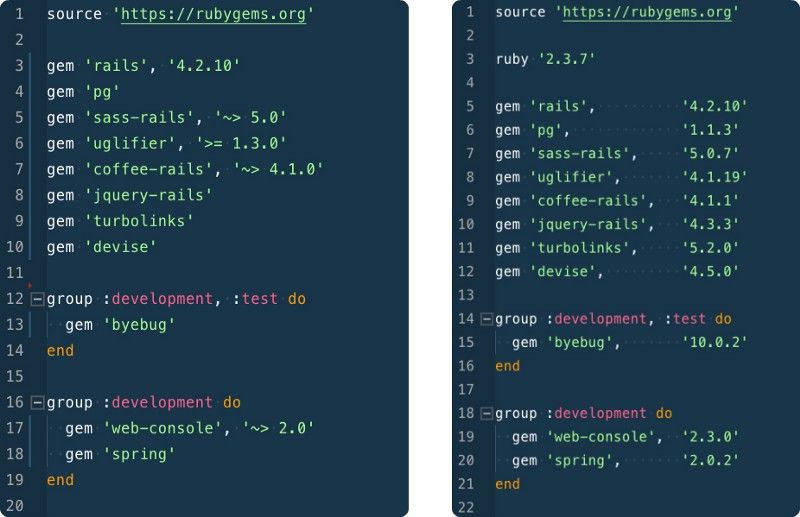
If we have a Gemfile like one on the right side (fig 1) then we can empty Gemfile.lock and bundle install gems, doing so bundler will resolve such dependencies.
Hence, we can run the following commands whenever needed or whenever it is overwhelming to resolve such dependency error(s).
$ > Gemfile.lock  # this will empty Gemfile.lock
$ bundle install  # bundler will resolve dependencies
Note: check gemspec of each gem to find out which gem makes the dependency error(s)/issue(s).
Speed up Rails commands
As our application grows in terms of features and codebase, Rails commands will become slower (may take 15-25 sec for larger apps) and development will become slow & boring.
The following gems will help us to speed up Rails commands
1. zeus
Here we will see how zeus helps us to speed up commands.
As compared to other gems, zeus is designed to work outside bundler (no need to add in Gemfile) and compatible with parallel_tests where spring lacks native support for gem parallel_tests.
Let us see how zeus works,
# tab 1

rails_app $ gem install zeus
Successfully installed zeus-0.15.14
Parsing documentation for zeus-0.15.14
Installing ri documentation for zeus-0.15.14
Done installing documentation for zeus after 1 seconds
1 gem installed

rails_app $ zeus init
   create zeus.json
   create custom_plan.rb

rails_app $ zeus start
Starting Zeus server v0.15.14
[ready] [crashed] [running] [connecting] [waiting]
boot
  └── default_bundle
      ├── development_environment
      │   └── prerake
      └── test_environment
          └── test_helper
Available Commands: [waiting] [crashed] [ready]
zeus generate (alias: g)
zeus destroy (alias: d)
zeus dbconsole
zeus rake
zeus runner (alias: r)
zeus console (alias: c)
zeus server (alias: s)
zeus test (alias: rspec, testrb) [run to see backtrace]
After we run the above commands, open a new tab in the console and try the available zeus commands and notice the command speed. you can test the speed of commands as follows
we recommend to stay on zeus for Rails version 3 & 4. Zeus does not support Rails 5 yet as hot reload mechanism changed in Rails 5.
Note: zeus is written in golang
2. spring
spring gem developed in pure ruby and that's the only reason it was added Rails 4.1 stack as a default gem under development group. It will take time when we run command for the first time in the console then a background process will start for spring server.
To use spring to speed up Rails commands, we need to prepend commands with spring as follows:
rails_app $ time rake db:reset

real 0m3.600s
user 0m1.674s
sys  0m0.526s

rails_app $ time spring rake db:reset

real 0m1.204s
user 0m0.208s
sys  0m0.089s
As compared to zeus, spring server starts in the background and the server starts when we run our first command with spring. You may check spring server using the following command
rails_app $ ps aux | grep spring
aravind .. spring app | microposts | started 4 mins ago | developm..
aravind .. spring server | microposts | started 4 mins ago
Since, spring doesn't natively support multi-thread, it won't be a best match for gem parallel_tests. For more info you can check this issue.
Note: zeus works faster as compared to spring.
3. bootsnap
Once we reach Rails version 5.0, we can use bootsnap instead of zeus, as zeus does not support Rails 5.1 yet.
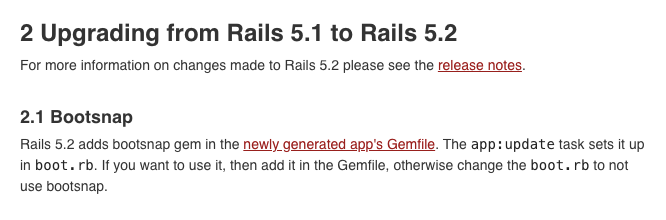
Rails added bootsnap(v1.1.0) as a default gem in Rails version 5.2 (see fig. 2)
To have bootsnap in our app, first we need to add bootsnap gem in our Gemfile
# Gemfile

...
group :development do
  gem 'bootsnap', '1.1.0', require: false

...
Now, add bootsnap in config/boot.rb
# config/boot.rb

ENV['BUNDLE_GEMFILE'] ||= File.expand_path('../Gemfile', __dir__)

require 'bundler/setup' # Set up gems listed in the Gemfile.
require 'bootsnap/setup' # Speed up boot time

...
We recommend to use bootsnap, once we are on Rails version 5 or later.
Upgrading Rails app
After following above steps, we are good to go for upgrading Rails.
As we are working on Rails upgrade, we have upgraded a Rails app which is running on a Rails version 3.x. Here, we want to share the breaking changes in versions 3 and 4 which makes the upgrading process painful and hectic.
The initial breaking change we encountered with Rails 4 was routes. In Rails 4 match has been removed and we have to use one of get , put, post and delete methods for HTTP GET, PATCH, POST and DELETE respectively.
Replacing match with the respective http method is time consuming if the routes are not well documented.
We can find complete list of changes in upgrade Ruby on Rails guides and the following gems will help us with smooth transition from version 3 to 4.
gem 'protected_attributes'
gem 'rails-observers'
gem 'actionpack-page_caching'
gem 'actionpack-action_caching'
The protected_attributes gem provides attr_accessible , attr_protected methods in Rails 4, then we can replace these methods with strong parameters.
2. gem rails-observers
The rails-observers gem removed from stack in Rails 4. We can add this gem to Gemfile, If observer exist in our app.
3. gem actionpack-page_caching
The gem actionpack-page_caching provides caches_page, page_cache_directory methods in our Rails app. We can use this gem if these methods are used in our rails app.
4. gem actionpack-action_caching
The gem actionpack-action_caching provides caches_page , caches_action and before_action filter for caches_action . We can use this gem if our Rails app uses these methods.
Let's continue with the problems we have faced while upgrading Rails from version 3.x to 4.x.
Removing jquery-rails
If we have older jquery-rails of version 2.3.0 in our app and other gems(ex: active_admin) may require jquery-rails of version 3.0 or later, then to upgrade all other gems, assets gems shouldn't create a problem as we don't want to upgrade jquery.
Note: Rails 5.1 dropped jquery from default stack. Find more info here.
To avoid upgrading jquery or jquery-rails gem what we can do is we can extract the assets from jquery-rails gem and include it in our application.js or wherever it needs. Lets see how we did it.
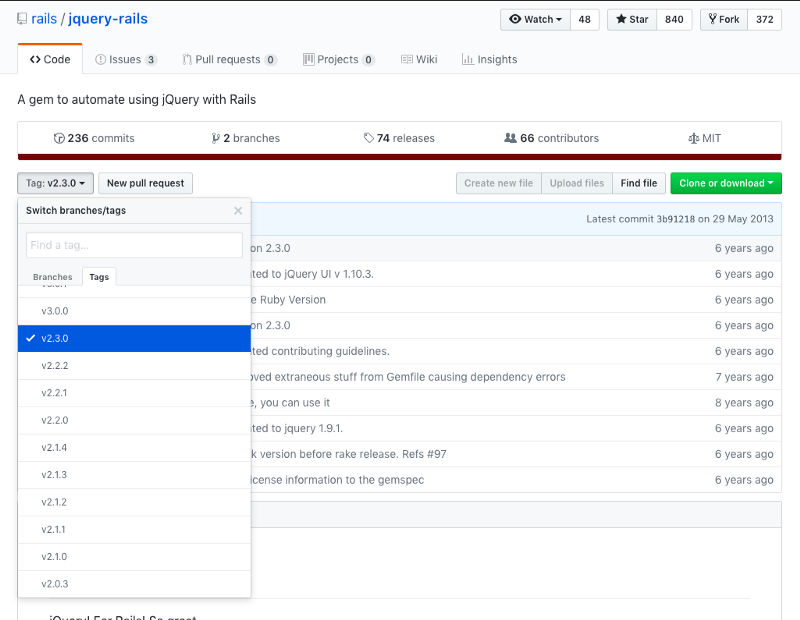
First, we need to check the installed version of jquery-rails in our app
Visit jquery-rails and click on branches, then click on tags then select 2.3.0, see fig 3
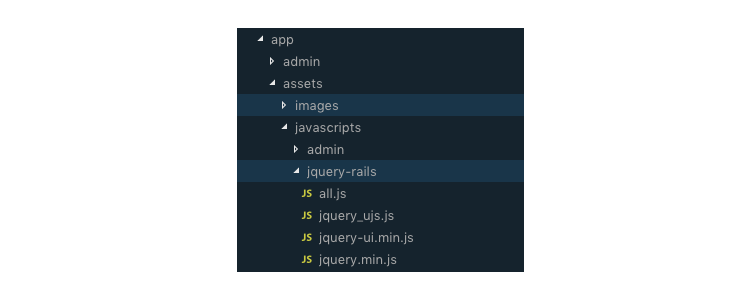
Now copy vendor/assets/javascripts files to our app's folder assets/javascript/jquery-rails and require all files in one file and name it assets/javascripts/jquery-rails/all.js, see fig 4 & 5.
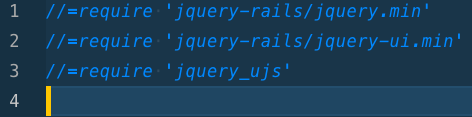
Now, we can remove jquery-rails gem. go to your Gemfile and remove jquery-rails. open application.js and import the jquery-rails/all.js in place of jquery-rails . see fig 6

Similarly, we can remove other assets gems if they have a dependency problem with other gems.
Recommended Approach - Upgrade Gems one at a time
The upgrading Ruby on Rails at rails.org will give us a full brief about how we can proceed with the upgrade and what are the major changes/features in rails 3, 4 or 5.
But, here we have a different approach in upgrading Rails viz., instead of upgrading all the gems at once, we can upgrade one gem at a time which covers a specific module(ex: jobs, mailers, ..) of our application.
But, sometimes a gem needs another gem to be updated along with it due to dependency, in that case, we need to upgrade both.
Upgrade all your gems one by one in older Rails version. Then upgrade Rails, if it needs the Ruby upgrade then do both at the same time. Repeat this until you reach the latest Rails version.
For example, If we are on Rails 3.2.22, then we upgrade all the gems one by one where gems support Rails 3.2.22 & 4.0 and then we will proceed with upgrade rails to version 4.0. But, Rails 4.0 requires ruby 1.9.3 and above. If our app is running on older ruby version (< 1.9.3) then we need to upgrade ruby then rails or both.
If we follow the above approach and upgrade gem one at a time and push it to the production, then we may get fewer errors and end up as happy developer. If there are any bugs in production then it will be easy to handle.
Summary
I really enjoyed upgrading Rails because of its benefits in maintainability, fewer production bugs due to newer versions, bug fixes and performance benefits. As of now we have upgraded three Rails applications from Rails 3 to Rails 5 and I am happy to say that we are on a Rails 5.2.2 😃
Let us know what you are up to on Rails upgrade and do drop us a comment if you have any queries, thoughts or suggestions.
