
Reaction Commerce is an open-source E-Commerce platform that allows anyone to customize, extend, and deploy an online store or marketplace.
In this article, we will explore the evolution of Product in Reaction from creation to the final order of the product. We will also explore what all phases a product goes through, all its important fields and their significance.
This blog post will not only serve as a guide to Reaction Commerce Products but also can be used as a reference for designing product schema in any E-Commerce application. The schemas and GraphQL APIs mentioned in this blog are referenced from v3.0.0 branch.
Pre-requisites
-
You need to have Reaction installed to be able to actually try and use the Storefront and Admin UI. You can install Reaction using the instructions in reaction-development-platform repo.
-
Operations that we perform from Admin UI and Storefront are because of GraphQL API reaction server provides, so basic understanding of GraphQL would be helpful to follow this blog though not necessary.
Creating a Product
-
When we login to operator/admin UI, we can create a
Productfrom the products page, found inside the navigation. -
Clicking on the
Create Productbutton takes us to the product creation page. -
Here we can enter all the details for products and variants to create a product.
-
We need to use
createProduct,updateProduct,cloneProductsandarchiveProductsmutations to create/update/clone/archive products. -
To fetch the products, we may use
productorproductsqueries. -
These GraphQL API specifications can be found in product/schema
-
Product schema can be found in product/simpleSchema.
-
Reaction provides some events to allow custom logic to be executed once the product is updated or archived using
afterProductUpdateandafterProductSoftDeleteappEvents. -
We will be going through some of the important fields of product schema in the next sections.
Title
-
We need to add a title for a product which could be something like
Earphone,SmartWatch. -
This title is also used to create a product page link on the marketplace. So it would be better to have it unique, so the product page URL is unique(i.e.
Permalink). -
So the title should be the product name along with model and vendor name so its unique as compared to other products.
-
For example, if
T-Shirtis our product andHanesis ourvendorthen we must identify the product model and make likeHanes Men's Long Sleeve Cool Dry T-Shirt. This will not only make the name unique but also identifiable while searching/browsing.
MetaFields/Metadata
-
On the Product page, we will find another input called
Metadatawhich can be used to store extra product-related information. ForT-Shirtwe can have metadata field like
Detail Name: WashandDetail Information: Dry. It could also be about the type of material. -
Metadatafor the product is saved in the database asMetaFields. -
This is an array of objects meaning we can have many key-value pairs as Metadata.
-
Its schema is available in product/simpleSchema file.
Variants
-
Variantsis the actual sellable item and needs inventory and price tracking. -
A variant is nothing but an extension of the product. So if we need to find any variant in the database, we must look into the
Productscollection by itsvariantId. -
Also is in the database, if a document is a variant it will be identified by following two fields and its whole schema can be found here.
{
  ...
  _id: "variantId1"
  type: "variant",
  ancestors: ["productId"],
  ...
}
-
While a product document has type
simpleand itsancestorsarray is empty. -
If
T-Shirtis a product, then sizes or colors could be its variants. But if we do not want to add any variant to this product, we can let the variant title be empty. -
We could use logic to display such a product on the marketplace that will not show its variant name or even add a default variant name to all products whose variants need not be shown. This is needed because we cannot have a product without a variant.
-
Also if we have some warehouse management in place, we can use variants ID to track the inventory and price.
-
We can add as many variants to products as needed.
-
There are other important fields like:
-
index: Order in which the variants should be shown on the marketplace products page. -
minOrderQuantity: Indicates the number of product variants a user can order in order. -
lowInventoryWarningThreshold: Indicates when the stock should be shown aslimitedfor a product. This flag is used to setisLowQuantityfield of variant product to true or false.
-
-
We need to use
createProductVariant,updateProductVariant,cloneProductVariantsandarchiveProductVariantsmutations to create/update/clone/archive product variants. -
Reaction provides
afterVariantUpdateevent for variants.
Sub-variants
-
Reaction Commerce allows us to add sub-variants as Options to a variant that can be found at the bottom of the variants page.
-
Like variants, we can have as many options as we like.
-
Sub-variant or
Optionsschema is same as variant. It has itsancestorsas its parentvariantId. -
If we have want to add a
T-Shirtof colorRedandBluein various sizes, we can use:
const product = {
 ...
 title: "T-Shirt"
 ...
 variants: [
  {
    ...
    label: "Color",
    title: "Red",
    options: [
      {
        ...
        label: "Size",
        title: "Large"
        ...
      },
      {
        ...
        label: "Size",
        title: "Small"
        ...
      }
    ]
  ...
  },
  {
    ...
    label: "Color",
    title: "Blue",
    options: [
      {
        ...
        label: "Size",
        title: "Large"
        ...
      },
      {
        ...
        label: "Size",
        title: "Small"
        ...
      }
    ]
    ...
  },
 ]
}
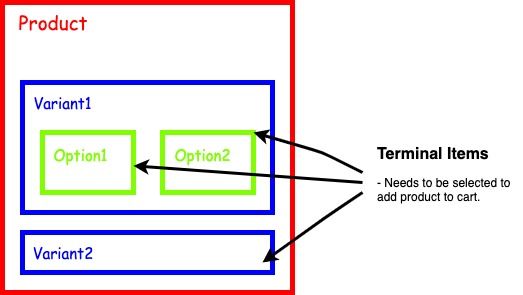
- Final Product-Variant-Option structure looks like below:
-
Terminal Item could either be a variant or an option of a variant and the user on the marketplace needs to select it to add the product to the cart.
-
Also, terminal items track price and inventory.
-
Sub-variants level nesting is not permitted. However, we can have n number of sub-variants.
-
Hence, we can either have terminal items as
variantorsub-variant.
Tags
-
We can add tags to products(not
variantsoroptions) to categorize the Product to a particular type, vendor, material or even color so the user can browse all such products using those tags in search or navigation on the marketplace. -
Tags could be
t-shirts,shirts,shorts,shoes,earringor whatever you feel are the main variety of products we intend to sell in our store. -
On the
Productspage, we can add tags from theTagssection. When we type any tag name while adding a tag, we get suggestions of existing tags and if there's no tag with the name we type, after hitting theEnterbutton a new tag gets created by that name. -
We need to be very careful while tagging our products, as it might give the wrong impression to users.
-
Tag created from the
Productpage, might not be visible on the marketplace if itsTag is enabled in storefrontinput is not checked which can be found on the tag edit page. -
When associating tags with products, one of the important features that a marketplace needs are making some products featured for particular tags.
-
This could be handy in many situations like displaying a few most selling products on the homepage for those categories or even the top brand products. As we cannot show the last
ncreated products for that section, which might lead to fewer product sales or even the wrong impression of our store. -
Using
featuredProductsfor a Tag, we want to attract users by showing out top quality or top brand or top-selling products, so the user is at least compelled to open that tags page and see other products listed under that tag. -
This can be done using the
Tagedit page. Go to a particularTagpage and switch to theProductstab on that page. You will see all the products listed for that tag in that section and also the option to assignPriority. -
When we add a tag to any product, the product
hashtagsfield gets updated with the newtagIdand it contains all the tags associated with the product.
const product = {
 ...
 hashtags: [ "tagId1", "tagId2" ],
 ...
}
-
Tag schema can be found in tags/simpleSchema
-
When we assign priority to any product from tags page, tag
featuredProductIdsfield gets updated in priority order.
//when product1 is assigned priority 0 for a tag1, the tag1 looks like below

const tag1 = {
 ...
 featuredProductIds: [ "productId1" ]
 ...
}
-
The productId priority number is nothing but the index/position of
productIdinfeaturedProductIdsarray. -
We need to use
addTag,updateTag,removeTagandsetTagHeroMediamutations for tags. -
To query tags data we can use
tag,tagsandproductsByTagIdqueries. -
These API specifications can be found in Tags GraphQL schema
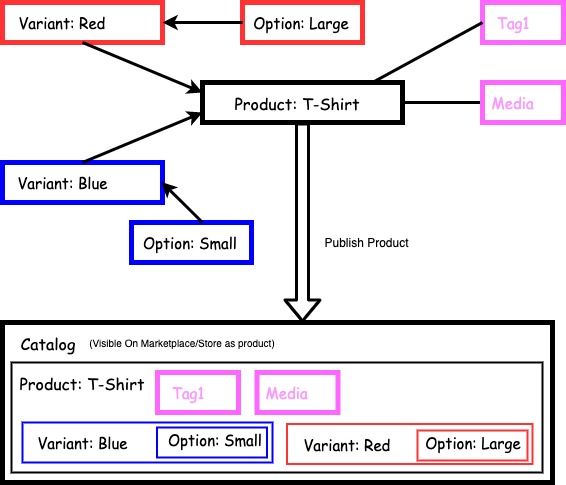
Publishing a Product(Catalog)
-
When we publish a product, a new document gets added to the
Catalogcollection. This can be done from the product listing page or from the product page itself. -
What we see on the marketplace or store is not a product but is a published version of the product i.e a
Catalogdocument. This is added to the cart and can only be ordered from Store. -
When we make a product
hiddenand published then the catalog is updated with that flag and the product is not sent in the query response. -
Catalogschema can be found incatalog/simpleSchema -
We use
catalogItemsquery to fetch all the catalog items andpublishProductsToCatalogmutation to publish any changes to the catalog. These can be found incatalog/schema. -
When a product is published all its association gets aggregated to form its catalog. Things like
media,tags,variantsget added as an object into the catalog so that its self contained and has all the required data for the marketplace.
- If you are implementing search/navigation using ElasticSearch, then
Catalogcollection is what you will need to index to make the product search by tags, titles, description, price or quantityInStock.
Adding a Product to Cart
-
When a
Productgets published, it is available for store visitors to view and order. When a visitor decides to buy a product, visitor will need to add the product to theCart. -
When a product gets added to the cart, following two things are checked before adding:
- If the
productVariantprice for an item in the cart is the same as the actualproductVariantprice. - If the item quantity for the productVariant is less than or equal to
minOrderQuantitywhich we created inproduct.
- If the
-
If the cart item passes the above two checks they get added to the cart else the item is added
minOrderQuantityFailuresorincorrectPriceFailuresarray. -
Code for this can be found in this cart mutation
-
Once the items are added to the cart we then need to set a shipping address for the cart before checkout using
setShippingAddressOnCartmutation. -
At this stage, the product quantity doesn't get updated as the product is still not purchased.
-
ReactionCommerce provides
afterCartCreateandafterCartUpdateevents for cart, so that we can perform extra operations related to cart in our custom plugin using those events. Its definition is here. We will need to write the logic for this instartup.jswithappEvents.on("afterCartCreate", callback).
Ordering a Product
-
After adding product to cart, the user can proceed to the checkout page and select all the required information like
shipping address,payment methodand finish the checkout to create the finalOrder. -
When an order gets created the product inventory count gets updated, to reflect the ordered product quantity in total stock.
-
After the cart gets created we need to:
- set shipping address for the cart using
setShippingAddressOnCartmutation. - set fulfillment option for the cart using
selectFulfillmentOptionForGroupmutation.
- set shipping address for the cart using
-
After the above steps, we will need to select the
payment methodto place the order usingplaceOrdermutation. -
Then the order email gets sent and product stock quantity gets updated.
-
The
order/simpleSchemaprovides the schema for order. -
Events related to order are
afterOrderUpdate,afterOrderCancel,afterOrderCreate,afterOrderPaymentCapture,afterOrderApprovePaymentwhich provide emit events related toorder.
I hope this blog gave you a basic understanding of all the phases a product goes through and also the APIs which get used in each phase. You can explore more on ReactionCommerce official docs or on github.
Thanks for reading.
Edit: Updated the reaction repo github links