
In previous articles, we have seen how to setup droplet on DO and installation of Nginx with the passenger.
Capistrano provides you advanced tools to deploy your applications on the web server. It also allows you to perform pre and post-deployment steps such as restarting a web server, running migrations, deleting cache, etc. You can also write your custom task to run while deployment.
Capistrano takes your code from version control such as Git and copies it onto your server via SSH. In this article, we will, be covering basic steps to deploy your application on a single server from Git.
Add Capistrano gem in your Gemfile using require: false
group :development do
  gem 'capistrano',         require: false
  gem 'capistrano-rvm',     require: false
  gem 'capistrano-rails',   require: false
  gem 'capistrano-bundler', require: false
end
Then run bundler to install the gem.
bundle install
Make sure application does not already have Capfile or capfile and then run
cap install
This creates all the configuration files needed to deploy your application on Capistrano for staging and production stage. These files are just templates. You will need to edit those file according to your configuration settings.

To customize the stages run
cap install STAGES=local,sandbox,qa,production
To organize the source code and other deployment-related data, Capistrano strictly defines a directory structure on each remote server. :deploy_to configuration variable can be used to set the path for this directory structure.
In config/deploy.rb file, add:
set :deploy_to, '/var/www/my_app_name'
After deployment, Capistrano will create following directories at /var/www/may_app_name:
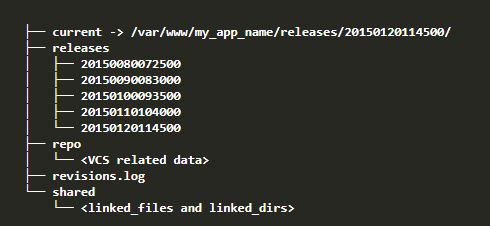
currentpoints to the latest release of the application. After each successful deployment, the current symlink gets updated. If the deployment fails, it will point to the old release.releasescontains all deployments in a timestamped folder.repocontains git repository.revisions.logkeeps track of every successful and failed deployment along with the executing user. Each entry is logged with a timestamp.sharedcontainslinked_dirsandlinked_files. This is mainly used for saving database configuration files, application configurations files, etc. that are common across all releases.
Configuration variables can be either global or stage-specific:
- Global ->
config/deploy.rb - Stage-specific ->
config/deploy/<stage_name>.rb
Also, add following configuration setting to your deploy/<stage_name>.rb file.
server '<server_ip>', user: 'ubuntu', roles: %w{app db web}, primary: true

set :branch, '<branch_name>'
set :domain, '<domain_name>'
set :deploy_to, '/var/www/<domain_name>'
Replace the content of Capfile with following:
# Load DSL and Setup Up Stages
require 'capistrano/setup'
require 'capistrano/deploy'

require 'capistrano/rails'
require 'capistrano/bundler'
require 'capistrano/rvm'

# Loads custom tasks from `lib/capistrano/tasks' if you have any defined.
Dir.glob('lib/capistrano/tasks/*.rake').each { |r| import r }
Capfile is used to load some pre-defined task to simplify our deployment process. Some examples:
- Automatically selects the correct ruby version
- Assets precompilation
- Clone git repository to correct location
- Install dependencies when
Gemfilehas changed
To configure Nginx, create config/nginx.rb file in your project directory and add following content in it replacing it with your parameters.
server {
  listen 80;
  server_name www.my_app_name.com;
}

server {
  listen 80;
  server_name my_app_name.com;
}

server {
  server_name www.my_app_name.com;

  root /var/www/my_app_name.com/current/public;

  client_max_body_size 5M;
  keepalive_timeout 10;

  # Turn on Passenger
  passenger_enabled on;
  rails_env production;
}
After adding this, it listens for traffic on port 80, sets default maximum Client Body Size and Request Timeout values and enables passenger.
Replace the contents of config/deploy.rb with the following:
set :application, "my_app_name"
set :repo_url,        'git@github.com:MyOrganization/my_app_name.git'
set :user,            'ubuntu'

set :pty,             true
set :use_sudo,        false
set :deploy_via,      :remote_cache
set :ssh_options,     { forward_agent: true, user: fetch(:user), keys: %w(~/.ssh/id_rsa.pub) }
set :rvm_ruby_version, '<ruby_version>'
set :passenger_restart_with_sudo, true

set :format,        :pretty
set :log_level,     :debug
set :keep_releases, 5

set :linked_dirs,  %w{log tmp/pids tmp/cache}

namespace :deploy do
  desc 'Symlinks config files for Nginx.'
  task :nginx_symlink do
    on roles(:app) do
      execute "rm -f /etc/nginx/sites-enabled/default"

      execute "sudo ln -nfs #{current_path}/config/nginx.rb /etc/nginx/sites-enabled/#{fetch(:domain)}"
      execute "sudo ln -nfs   /config/nginx.rb /etc/nginx/sites-available/#{fetch(:domain)}"
   end
  end

  desc 'Symlinks Secret.yml to the release path'
  task :secret_symlink do
    on roles(:app) do
      execute "sudo ln -nfs #{shared_path}/secrets.yml #{release_path}/config/secrets.yml"
   end
  end

  after  :updating,     :secret_symlink
  after  :updating,     :nginx_symlink
  after  :finishing,    :compile_assets
  after  :finishing,    :cleanup
  after  :finishing,    :restart
end

namespace :logs do
  desc 'Tail application logs'
  task :tail_app do
    on roles(:app) do
      execute "tail -f #{shared_path}/log/#{fetch(:stage)}.log"
    end
  end
On Droplet, this will symlink nginx.rb to the sites-enabled and sites-available. It will also symlink secrets.yml that we have added in shared folder with secrets.yml present in the latest release. I have also created one task to check the application logs on your local.
Deployment
Whenever you want to deploy your application on the server, first commit the changes that you made and pushed them on to the remote Git branch.
git add -A
git commit -m "Initial Deployment"
git push origin <branch-name>
After pushing the changes on remote, run following command on your local from <branch-name>.
cap <stage_name> deploy --trace
This will push your application from Git onto the Droplet server, install all required gems for your app. This will take some time depending on the number of gems your application is using.
Here, --trace option will let you know all the commands that are running on droplet during this process, it will also show you an error if there is any.
Make sure you start your Nginx server after your first deployment and in future whenever you are making changes in nginx.rb file.
sudo service nginx restart
You should now be able to point your web browser to your server IP and see your Rails app in action!
Some references that you can check for a more detailed explanation of Capistrano.