
What is Font Awesome?
Font Awesome is a widely used font toolkit/library in web applications. Font Awesome helps to replace images with icons and provides various commonly used icons. It is easy to integrate with a web app.
Font Awesome is developed for web applications, but we can also use it in our mobile app. We have used font Awesome in one of the apps. It is not available out of the box for Android. Hence we can use AwesomeTextView Font Awesome library for ease of implementation.
How to integrate the library into the project?
-
Step 1: Add to your root
build.gradleat the end of repositories:allprojects { repositories { ... maven { url 'https://jitpack.io' } } } -
Step 2: Add the dependency to the project level
build.gradledependencies { implementation 'com.github.amangarg95:AwesomeTextView:1.0' } -
Step 3: Perform Gradle sync operation
How to use the library?
Utilizing this library in our project is really easy. We can use it simply as other view components. The following code snippet shows how we have used it in the android layout XML file.
  <com.amangarg.library.AwesomeTextView
    android:layout_width="wrap_content"
    android:layout_height="match_parent"/>
Advantages of using Font Awesome library
-
Helps to combine icon and text in a single text view
The library allows users to combine text and icons into a unified textview. With the help of
setFontAwesomeText( text: String, vararg additionalText: String)method, we can concatenate Font Awesome icon and text. ThesetFontAwesomeTextis the primary method of the library.awesomeTextView.setFontAwesomeText("fa-solid fa-star", "Hey, I am alternate text");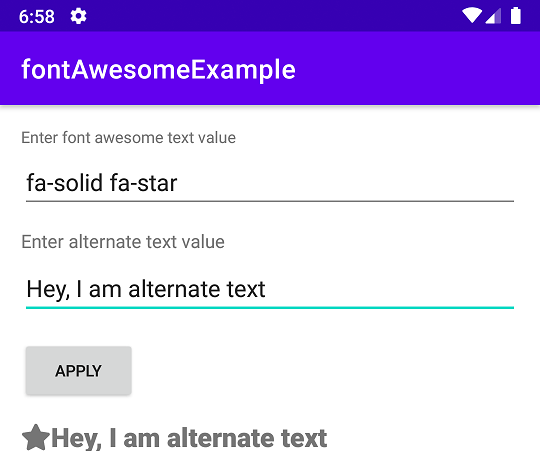
-
Set color of Font Awesome and alternate text separately
This is the second method provided by the library. With the help of this method, we can set different colors to the Font Awesome icon and alternate text, the text has been concatenated with the help of the above method. We can set Font Awesome icon color through
XMLorsetTextColormethod. If we are not using this method, then the same color is applied, whichever is applied through theXMLfile. The following example shows how to set two different colors to the single-text view.awesomeTextView.setTextColor(ContextCompat.getColor(this,R.color.red)); awesomeTextView.setAlternateTextColour(R.color.blue);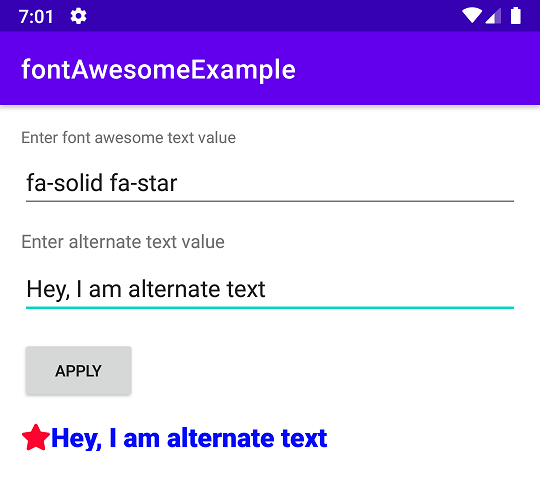
-
Flexibility to change the font
This library also provided the facility to change the font of the alternate text. The
setAlternateTextFontmethod is used to set the font of the alternate text. By default Font Awesome, font is applied to the text view. If the user wants to change the font of alternate text then they can use this method. The following code shows how to change the font. I have usedroboto-thinin the example.awesomeTextView.setAlternateTextFont(R.font.roboto_thin);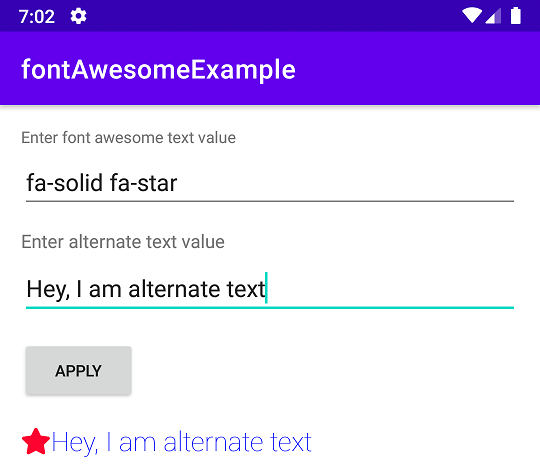
And there you have it! A simple and effective implementation of Font Awesome. I hope I've shown you how easy it is to use Font Awesome using AwesomeTextView library.
References :