
Automating test scenarios have become an integral part of any successful product release. We have selenium automation suite covering important feature flows. We run our test suite on a weekly basis as a regression health indicator. We deployed Jenkins, a CI/CD tool, to build, deploy and automate our test suite. In this article, we will explain the steps to set up Jenkins on our Ubuntu machine and how we overcame the various challenges we faced.
Background
We collaborate with a USA based large CRM SaaS application to build new features. We also enhance the application. We use Kanban Agile methodology in CRM projects as soon as user stories are ready to work. This process requires lots of deployments every week (viz. features, fixes, enhancements, support requests, etc). Quality is as important as speed to ship stories. For repetitive testing, having automation is paramount. At Kiprosh, we write integration tests with RSpec and Capybara. On every commit in Github, our CI/CD pipelines run the tests through automatic process. Selenium helps us with our functional and regression testing.
CI/CD
We get a new build deployed to QA every week with user stories, enhancements and bug fixes which are development complete. So we had to run our regression suite very often, manually. We wanted to automate this process. Thus, to run our suite automatically very often, we decided to use Jenkins as a CI/CD tool
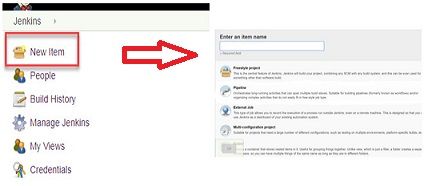
Jenkins installation process was very simple. For Jenkins installation, we referred link Jenkins Installation On Ubuntu.
To configure Maven project, one needs to download a Maven Plugin in Jenkins. And it took us sometime to understand this basic necessity.

Configuring it Right!
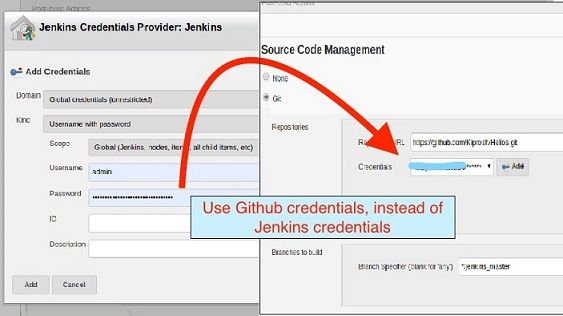
After the Maven Plugin installation, it needed a Jenkins restart to be able to import the project. Now the next logical step for us was to set Git in Source Code Management.. and hoped all was set to run the project but we got an error Failed to connect to repository. On further investigation, we discovered there were few more configurations required. An important thing that we learnt is, we need to have the same environment setup in Jenkins as we have on our local. Set path to git executable to Global Tool Configuration under Manage Jenkins option. A couple of more failed attempts taught us to add JAVA_HOME and MAVEN_HOME path as well.
Despite the setup being ready, Jenkins failed to connect to the repository with the error saying - Command "git ls-remote -h git@github.com: HEAD" returned status code 128: stdout: stderr: Host key verification failed. fatal: Could not read from remote repository. Please make sure you have the correct access rights and the repository exists. And updating our git credentials, we were able to see our code run...
Adding Ubuntu to the setup process
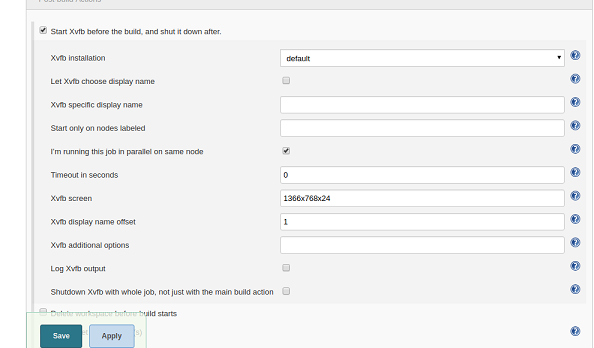
But within a second it failed throwing an exception unknown error: Chrome failed to start: exited abnormally. After analyzing the failure, we learned a new thing about setting up Jenkins on Ubuntu machine - Xvfb!
At the beginning this sounded alien but it's short form of X virtual framebuffer in Jenkins. Xvfb set the correct screen resolution. With the help of Xvfb, selenium is able to identify and manipulate the objects on the screen. Our investigation revealed that Xvfb is pre-installed. It's a matter of configuring it from Manage Plugins, and with some trial and error, we got the correct screen size.
We hoped for a smooth run after resolving the above errors. But again ran into errors where the test annotations were not recognized.
Harnessing the Power of POM!
Jenkins targets pom.xml file to run the maven project. The pom.xml will run all the tests in your suite if specific tests to run are not mentioned. Since its a test automation run only, we had some setup classes which need not run each time. We wanted to run only tests specified in testSuite.xml file. This file contains functional flows for the application. To make this happen we found out about Maven surefire plugin. The link Maven Surefire Plugin says, The Surefire Plugin can be used during the test phase of the build lifecycle to execute the unit tests of an application. This plugin helped us define the XML file picked up by pom.xml for execution.
  <build>
    <plugins>
      <plugin>
        <groupId>org.apache.maven.plugins</groupId>
        <artifactId>maven-surefire-plugin</artifactId>
        <version>2.12.2</version>
        <configuration>
          <suiteXmlFiles>
            <suiteXmlFile>testSuite.xml</suiteXmlFile>
          </suiteXmlFiles>
        </configuration>
      </plugin>
    </plugins>
  </build>
Now we thought we were very close to accomplishing our dream... and one of our maiden runs gave us a new exception aborting the build.
The exception was for testng
Maven Compilation error [package org.testng.annotations does not exist]
By default, scope is set to test in the testng dependency under pom.xml file. On investigation, we found out that we had to set the scope to compile rather than test.
  <dependency>
    <groupId>org.testng</groupId>
    <artifactId>testng</artifactId>
    <version>6.14.2</version>
    <scope>compile</scope>
  </dependency>
With this last change, our setup of the CI/CD pipeline with Jenkins was finally ready. The joy of automation and red/green report is immense.