
When we are about to test a dynamic API request via Postman and realize that we need to pass a freshly generated signature in the headers, what do we generally do?
For each request, we generate the signature using server-side code and copy-paste it in the headers.
Sounds like a tedious job, doesn’t it?
We faced a similar situation in our application where we had to pass a signature in the headers while testing an API. The signature was generated by encoding all the request parameters using the user's secret key. If any of the request parameters changed, we had to regenerate the signature at the server-side console and copy-paste it in the headers.
This is where the Postman pre-request scripts came to our rescue. We no longer had to depend on the server-side console to generate the signature, we could make Postman itself generate it for us.
This article explains how to use the pre-request feature of Postman to generate a signature.
What are pre-request scripts?
As the name suggests and as mentioned in the Postman Documentation, these are small snippets of code in JavaScript that are executed before sending any request.
So, whenever you want to do some processing of parameters before sending them in any request, you can do it using the pre-request scripts.
There is a Pre-request Script tab beside the Body tab where we can add our scripts. These scripts are executed for us by the Postman Sandbox.
More information - here
Let us try to understand how pre-request scripts can help us in signing a request using the following practical example.
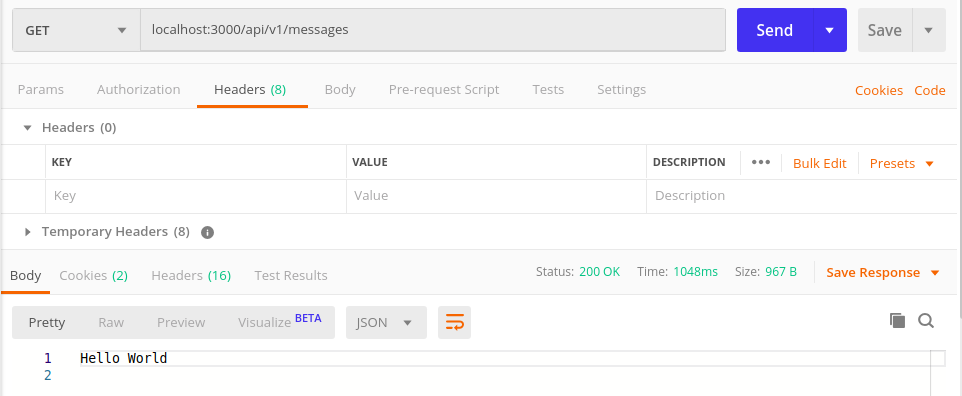
Simple Postman Request for an API without authentication
We will add an API endpoint in our application that returns a message in the response. Note that we have not added any kind of authentication yet. When we send the request via Postman, the API returns the message “Hello World”.
We all know exposing the APIs without authentication/authorization could be risky. So we'll implement HMAC authentication for our APIs. Since our application is built on Ruby on Rails, we'll incorporate the APIAuth gem to enable authorization.
After the addition of the APIAuth code at the backend, it is now time to test the API using Postman.
Postman request for the same API with server-side authentication
Let us send the previous request again and see what we get.
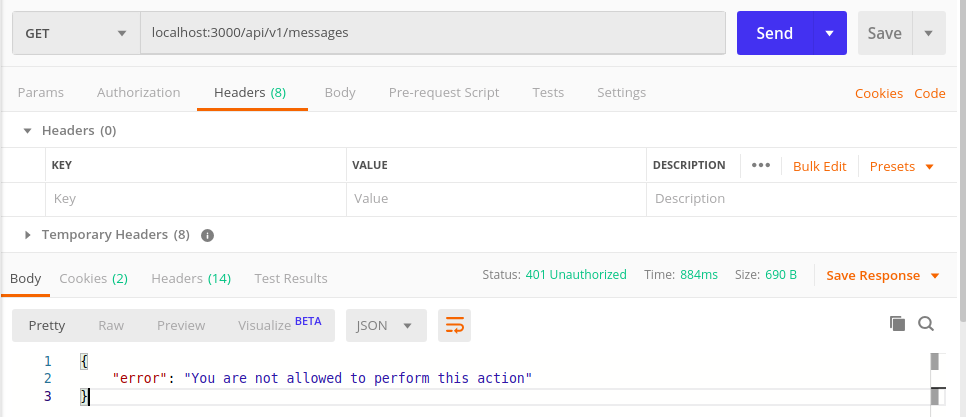
401 Unauthorized Error!!
This is predictable because the API is now expecting a signature to be sent in the request, from which it can decode and identify who made the request. Since we didn’t pass any signature, we were rendered unauthorized.
Building the pre-request script for signing the request
To prove the authenticity of our request we need to pass a signature in the headers.
For that, we'll refer to the APIAuth document and see what it says about signing the request. Then we will mock or replicate the same using pre-request scripts.
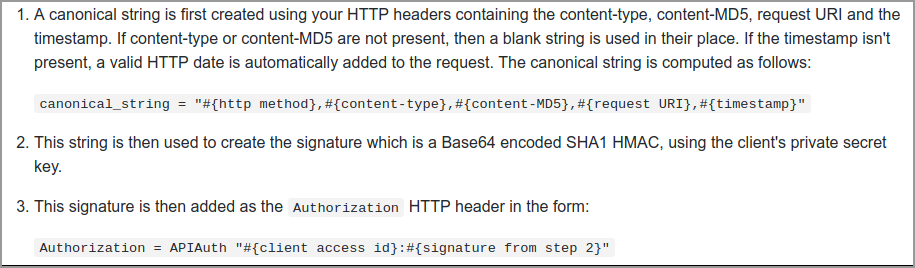
This is a snapshot of the APIAuth document explaining how the request has to be signed.
Let’s go through each of these steps to generate the signature via Postman.
The first step tells us how to generate the canonical string

Refer to the document provided by Postman postman-sandbox-api-reference, it provides several NodeJS libraries that can be used while building Postman scripts.
- The HTTP method in our case is
GET. Alternatively, we can use thepm:Objectprovided by the Postman Sandbox and get the HTTP method aspm.request.method. Further information available here - Since we do not need
content-typeandcontent-MD5in the request we may keep them blank. Or we may fetch thecontent-typeandcontent-MD5using thegetHeaders()method.
pm.request.getHeaders()['Content-Type'] || '';
pm.request.getHeaders()['Content-MD5'] || '';
- The request URI is the API path without the domain. In our case, it is
/api/v1/messages. We can also get this by using the functiongetPathWithQuery()provided by the Sandbox as:
pm.request.url.getPathWithQuery();
- Now lastly we need the timestamp. We can use the
momentlibrary to generate the timestamp. We'll call themoment()function, and store the current time in a temporary variabletimestamp.
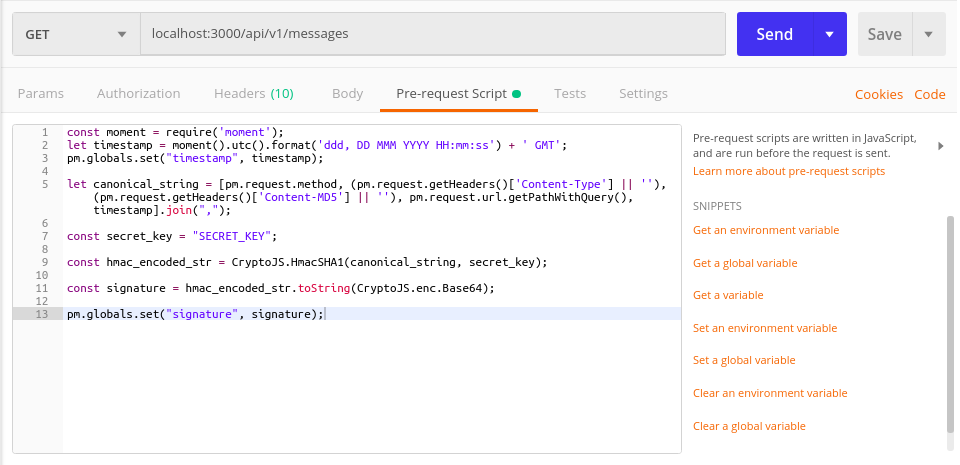
const moment = require('moment');
let timestamp = moment().utc().format('ddd, DD MMM YYYY HH:mm:ss') + ' GMT';
Note: We have converted the timezone to UTC as our application compares the time in UTC format
Now that we have all the values, we’ll build the canonical string as follows
let canonical_string = pm.request.method + "," +
  (pm.request.getHeaders()['Content-Type'] || '') +"," +
  (pm.request.getHeaders()['Content-MD5'] || '') + "," +
  pm.request.url.getPathWithQuery() + "," + timestamp;
or simply in our case, it is
let canonical_string = “GET,,,/api/v1/messages,” + timestamp
The next step says we have to encode the above canonical string using the client's private secret key.

This secret_key would be a random string associated with each user (stored in Database
or any other storage engines). Let us fetch that value for the user and store it in a
variable.
const secret_key = “SECRET_KEY”
Now we need to encode it using HMAC SHA1 algorithm. For this, we will use the
CryptoJS library provided by the Postman Sandbox - here
Note: We can click the links in this site to view the documentation for each library.
As per the crypto-js document, we can generate the encoded message as follows:
const hmac_encoded_str = CryptoJS.HmacSHA1(canonical_string, secret_key)
As mentioned in the above step the signature must be a Base64 encoded HMAC SHA1 string. So we need to further encode it using Base64.
const signature = hmac_encoded_str.toString(CryptoJS.enc.Base64)
That's it!! We have successfully generated the signature.
The third step says that we have to add the signature in the headers of the request.

But we have the signature as a local variable. How do we make it accessible in the headers?
The solution is to use an environment variable or a global variable.
For simplicity, we will set the variables as global. To do that we can use the pm object provided by the Sandbox environment. You could also use postman.setGlobalVariable(‘signature’, signature) but that has been deprecated in the newer versions. You can learn more about it - here
pm.globals.set(‘signature’, signature);
This is how the combined script looks in Postman.
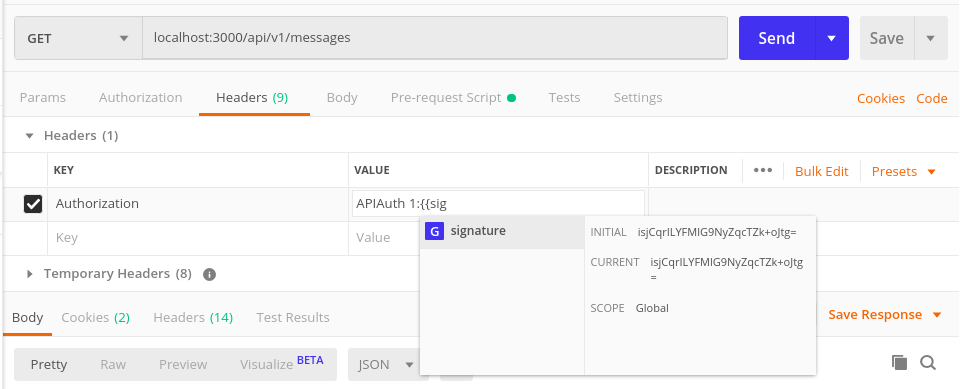
As you can see we have added the Authorization header with the value in the format APIAuth 1:{{signature}}
Note:Client access Id is the unique id of the user whose secret_key we had used, equal to 1 in our case.
As soon as we enter {{ in the value field, it lists all the global/environment variables available. We just have to select signature from the list.
We'll send the request again with the DATE and Authorization included in the headers.
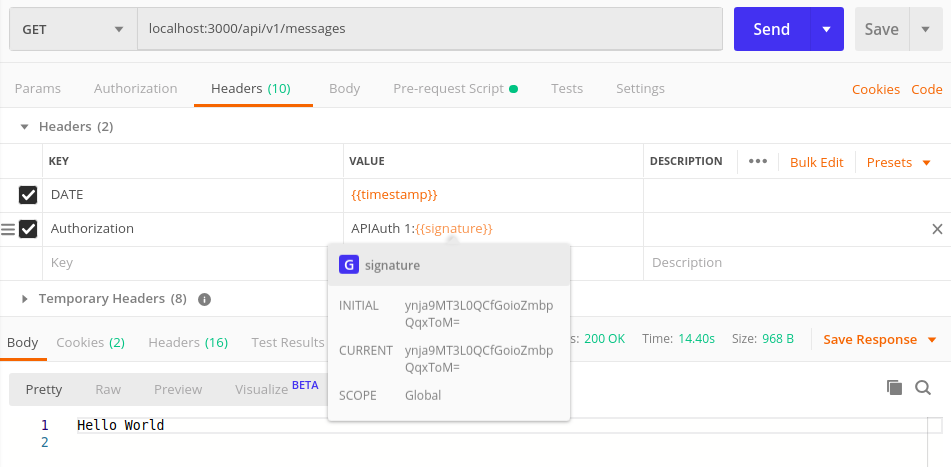
You can see we get the message Hello World in the response. This means we have successfully generated the signature using a pre-request script.
Similarly, if we know the procedure for signing any API request, we can use the NodeJS libraries provided by Postman to generate that signature.
Hope this article has helped you in knowing how to use the pre-request feature of Postman to test dynamic APIs. Please do try creating such scripts for other APIs and let us know if it helped.
Thank you for reading.
References
https://learning.postman.com/docs/postman/scripts/postman-sandbox-api-reference/